This week’s post is dedicated to an engine part that is often overlooked, its importance not totally understood, and its service specs minimal. I’m talking about the timing chain. I want to discuss and share with you some signs that the cam chain is worn out.
Just like the drive chain, timing chains elongate, fatigue, and wear out. Luckily, they are not subject to dirt and mud, are bathed in an oil bath, and their overall environment is much better. Before I get into it, one misconception I want to clear up right away is that the timing chain doesn’t technically stretch. Instead, the pins and rotating elements of the chain wear. When the pins wear they become smaller and their mating holes grow larger leading to increased clearances and chain length.
When an engine is run with a worn timing chain engine performance is compromised and the likelihood of related failures is greatly increased (think chain tensioner). The three main problems are less precise valve control, cam timings that are off, and increased chain slack within the valvetrain. On stock engines where clearance between the piston and valves is plentiful less precise valve control normally won’t be a problem nor will severely out of spec cam timing. However, on performance engines set up with aftermarket cams which reduce the clearance between the piston and valves, lack of valve control and incorrect timing can lead to valves that befriend the piston.
The good news is that the majority of folks aren’t running heavily modified engines so worries of valves contacting the piston are minimal with a worn cam chain. The remaining problem, which applies regardless of whether the engine is stock or modified when the timing chain has worn, is that the cam chain tensioner will have quite a job trying to take slack out of the valvetrain. When a timing chain elongates it may not do so in a uniform way and parts of the chain may be tighter or looser than others. While automatic cam chain tensioners have proven to be reliable on the majority of engines, some model years, brands, and individuals have fared better than others. A worn timing chain which adds extra slop and inconsistent chain tension to the valvetrain certainly won’t make the tensioner’s job any easier. So it makes a lot of sense to keep tabs on the condition of the chain itself from time to time.
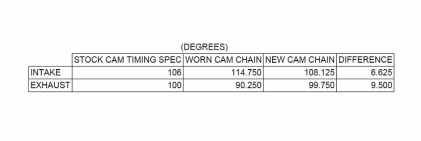
When I was working on a Kawasaki KX250F engine build I took the time to do some comparisons which illustrate the differences you will see between a new and worn out cam chain. First, with the worn chain installed I checked the cam timing. Then I installed the new chain and rechecked the timing. In the table below you can see the intake cam timing was retarded by 6.625° and the exhaust by 9.50° when compared to the new cam chain timing values. For the average weekend warrior this may not seem like much but in terms of performance engines this is miles off the mark!
When I was working on a Kawasaki KX250F engine build I took the time to do some comparisons which illustrate the differences you will see between a new and worn out cam chain. First, with the worn chain installed I checked the cam timing. Then I installed the new chain and rechecked the timing. In the table below you can see the intake cam timing was retarded by 6.625° and the exhaust by 9.50° when compared to the new cam chain timing values. For the average weekend warrior this may not seem like much but in terms of performance engines this is miles off the mark!
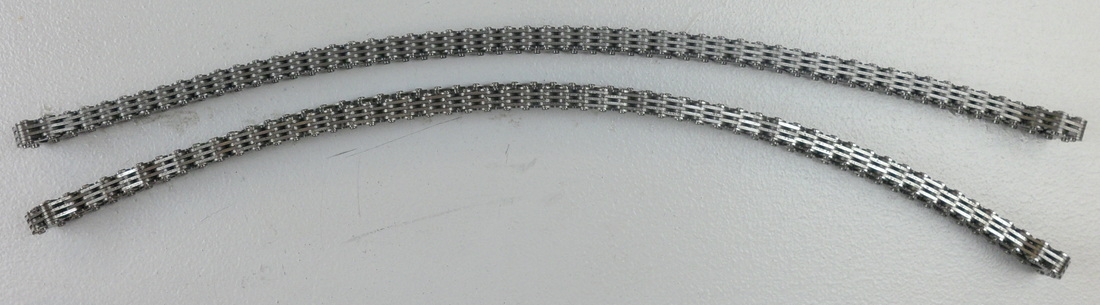
Next I looked at chain elongation. With both the new and old chain lying on the workbench it is easy to see a noticeable difference in chain length. The old chain is around 5mm longer than the new one.

You can also easily see how much more flexible the old chain is in comparison to the new chain as well.
These comparisons are all well and good but when do they become practical? Good question, since most of you won’t be checking the timing or removing the chain to compare it to a new one. Unfortunately, very few service manuals provide specifications or guidance on cam chains apart from the “inspect and replace as necessary” phrase commonly found throughout manuals. You may get lucky and find a pin to pin measurement spec you can use from time to time but it is not the norm. My suggestion is to document the applicable attributes of a new chain the next time you have one before installing it into your engine. This way you’ll have some tangible specs to compare to as the chain wears.
Method 1 - The Pin to Pin Measurement
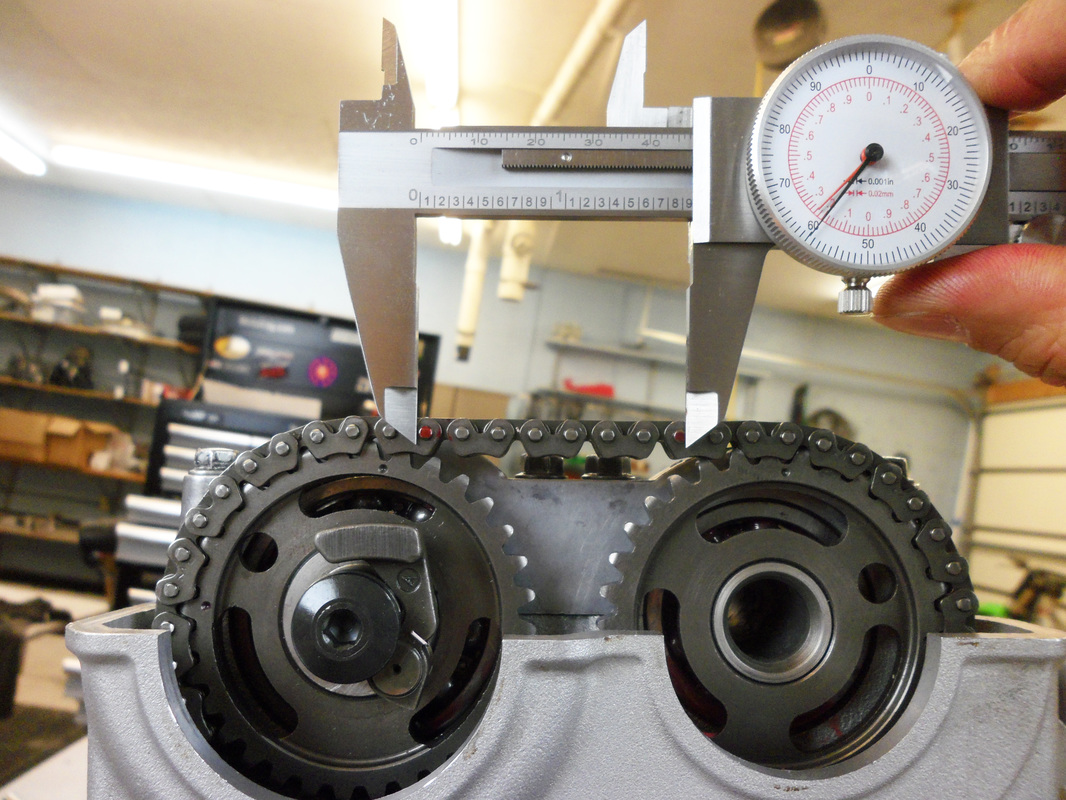
One of my favorite methods to gauge chain wear is to compare pin to pin measurements of new and old chains. To do this you will need to know the total number of pins on the chain. It is easiest to count the number of pins prior to installing the chain, however, pins could still be counted with the chain installed in the engine by marking one of the links, rotating the engine around, and counting.
Once the total number of pins is known a measurement across a set number of pins is taken with the chain installed. I like to span around 6 - 8 pins between the sprockets on a twin cam engine. Unicam engines are trickier and the number of pins you can measure is usually less. It is important to try and measure across multiple pins because the variation between new and old chain measurements will be more pronounced this way. With the new chain installed I measure 1.846” (46.89mm) across eight pins. This is my benchmark measurement and is what I will compare all future measurements to.
Once the total number of pins is known a measurement across a set number of pins is taken with the chain installed. I like to span around 6 - 8 pins between the sprockets on a twin cam engine. Unicam engines are trickier and the number of pins you can measure is usually less. It is important to try and measure across multiple pins because the variation between new and old chain measurements will be more pronounced this way. With the new chain installed I measure 1.846” (46.89mm) across eight pins. This is my benchmark measurement and is what I will compare all future measurements to.
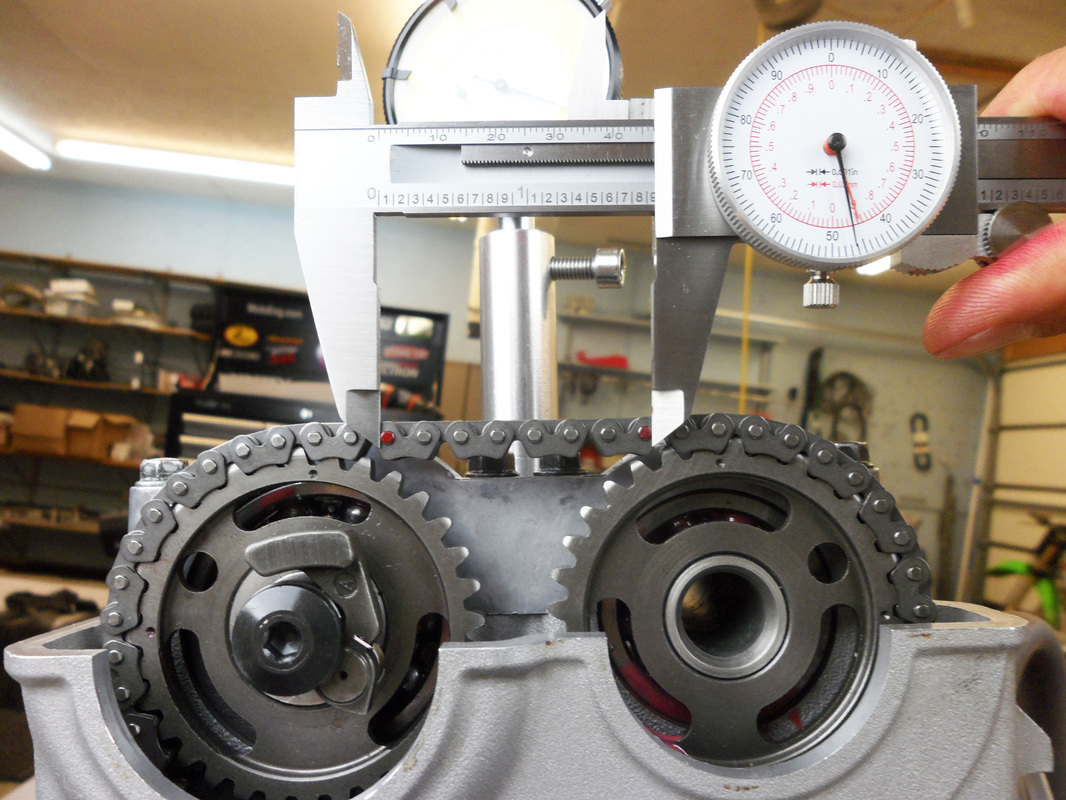
Over time, the chain will wear and it will elongate. To keep tabs on chain wear it is never a bad idea to check the condition of the chain whenever you check valve clearances. In the image below I replaced the new chain with the old and repeated my pin to pin measurement across eight pins. This time I measure 1.860” (47.24mm).
The difference in length between the new and old chain can be seen in the table below.
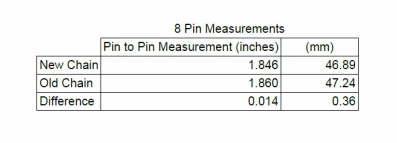
A chain length increase across eight pins certainly isn’t earth shattering at first glance but that is only a fraction of the chain. To get a better idea of the total chain length increase and the severity of the problem some math is required. My cam chain totals 114 pins and since I only measured eight pins I will need to divide 8 into 114 to determine my length multiplier.
8 pin segments which fit into a 114 pin chain = 114/8 = 14.25
Once I have determined how many 8 pin segments fit into a 114 pin chain I can multiply this value by the change in length between the two chains to determine the total length the chain has increased.
Total Chain Length Increase (inches) = 0.014" x 14.25 =0.200"
Total Chain Length Increase (mm) = 0.36 x 14.25 =5.13mm
The calculated increase is accurate since this is about the difference in length I saw when I laid the chains side by side and measured them. If you aren’t familiar with what changes in length are acceptable this example can be considered one on the far end of the spectrum. The engine had been seriously neglected and wasn’t in real good shape.
Method 2 - What Does the Chain Tensioner Say?
The second way you can observe chain wear is by comparing cam chain tensioner plunger position throughout the chain’s life. To do this the tensioner is temporarily installed, set, and the engine turned over at least four times to allow the tensioner to self tension. Once the chain tensioner has absorbed the chain slack it is removed and the plunger position is noted. Remember to either install the chain tensioner stopper tool or remove the center bolt and spring, depending on tensioner design, so that the plunger doesn’t extend as the tensioner is removed.
In the image below I marked the plunger position with the new chain installed. As you can see the plunger is hardly extended and the second tooth on the plunger is engaged.
In the image below I marked the plunger position with the new chain installed. As you can see the plunger is hardly extended and the second tooth on the plunger is engaged.
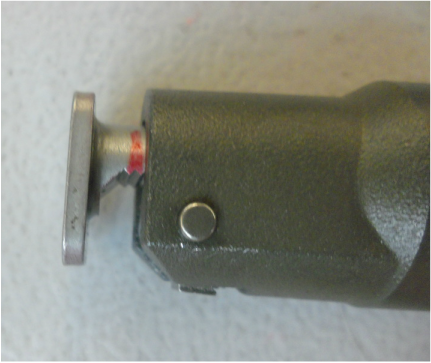
|
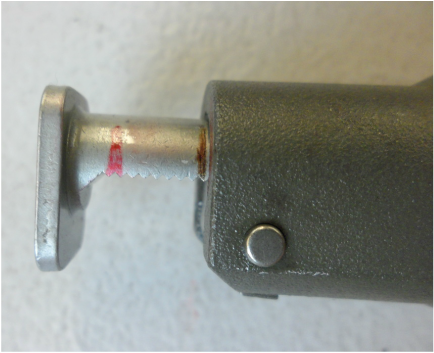
|
As the chain wears the plunger will have to extend out further and further to take up the slack. When I set the plunger with the old chain installed the ninth tooth was engaged on the plunger. Observations like this can be used to gauge cam chain wear and to determine when the chain should be replaced.
Method 3 - Alignment Marks and Feel
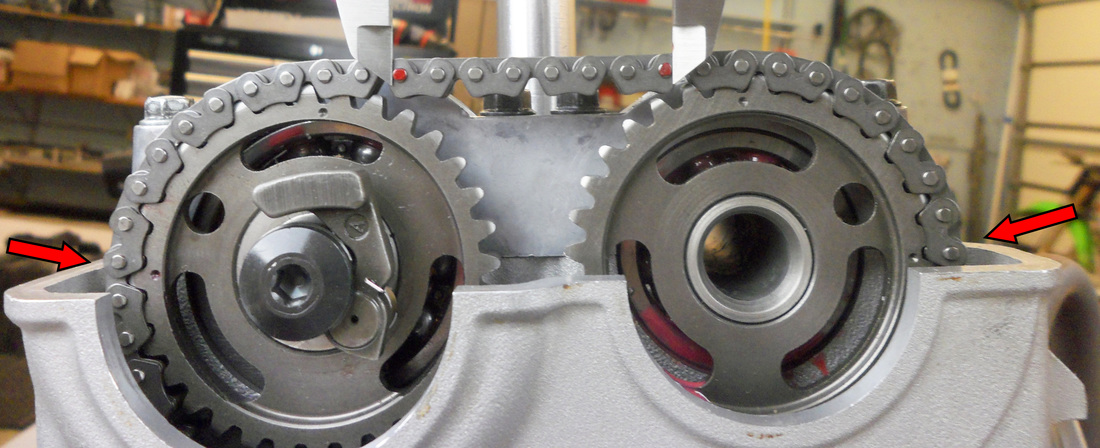
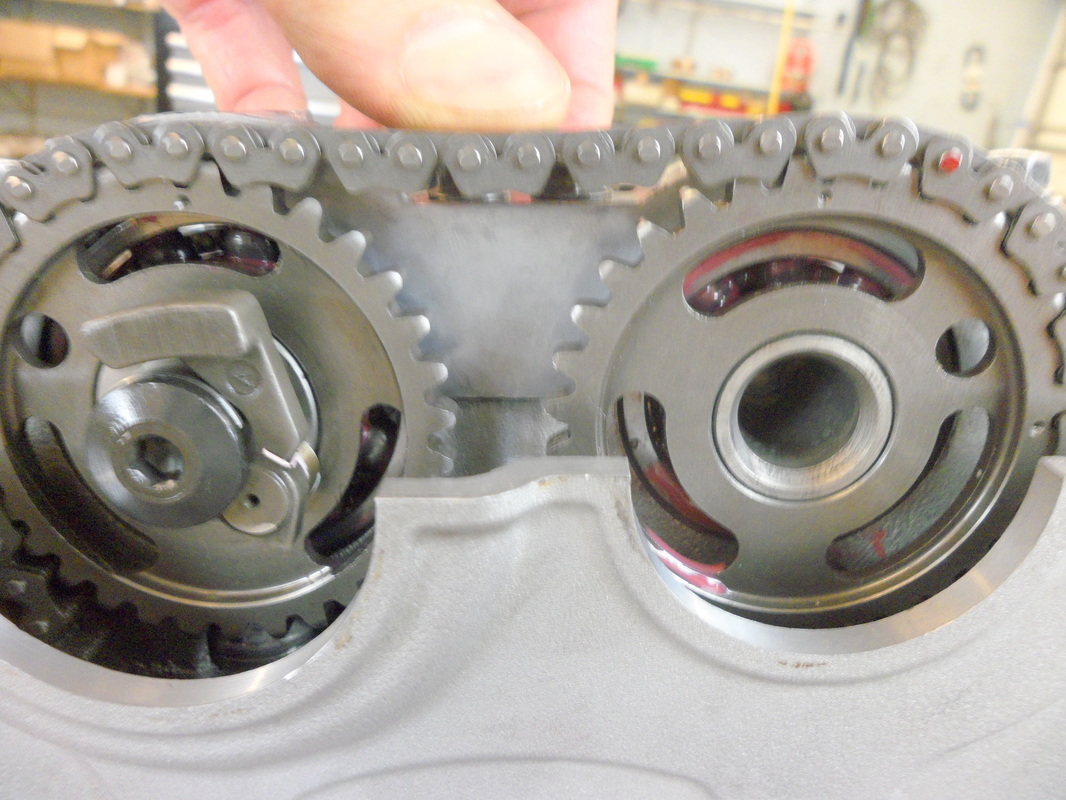
Every engine will have specific marks designed into components to aid in the timing of the engine. These marks can also be used to get an idea of the condition the timing chain is in. When correctly timed all alignment marks should be positioned nearly perfectly. As you can see in the image of the Kawasaki engine the two punch marks on the cam gears are aligned with the machined surface of the cylinder head. Both punch marks are visible and in the correct spot.
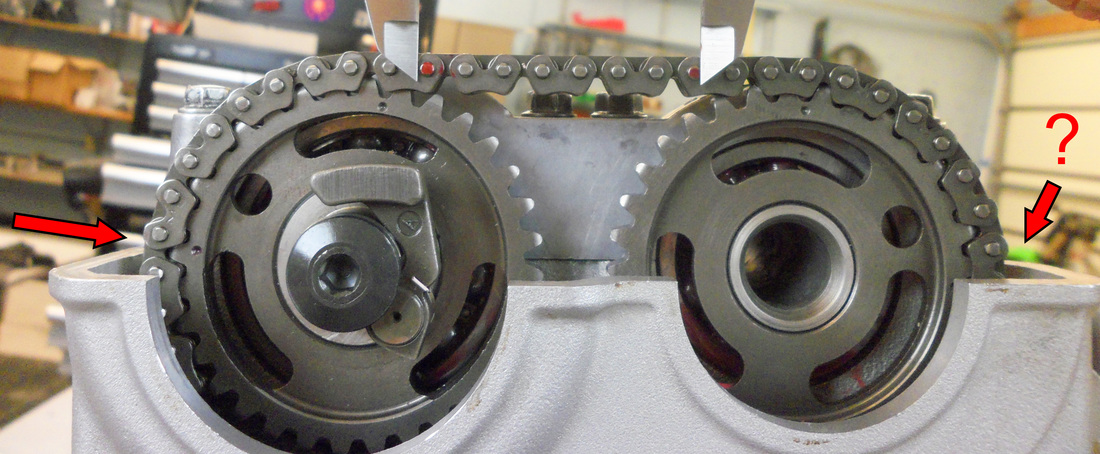
As the chain wears the tensioner will absorb slack and the cams will retard. In this image with the old chain installed the exhaust cam punch mark is far too high in relation to the cylinder head machined surface and the intake cam is not even visible. This is a good indication that the chain is worn and should be replaced.
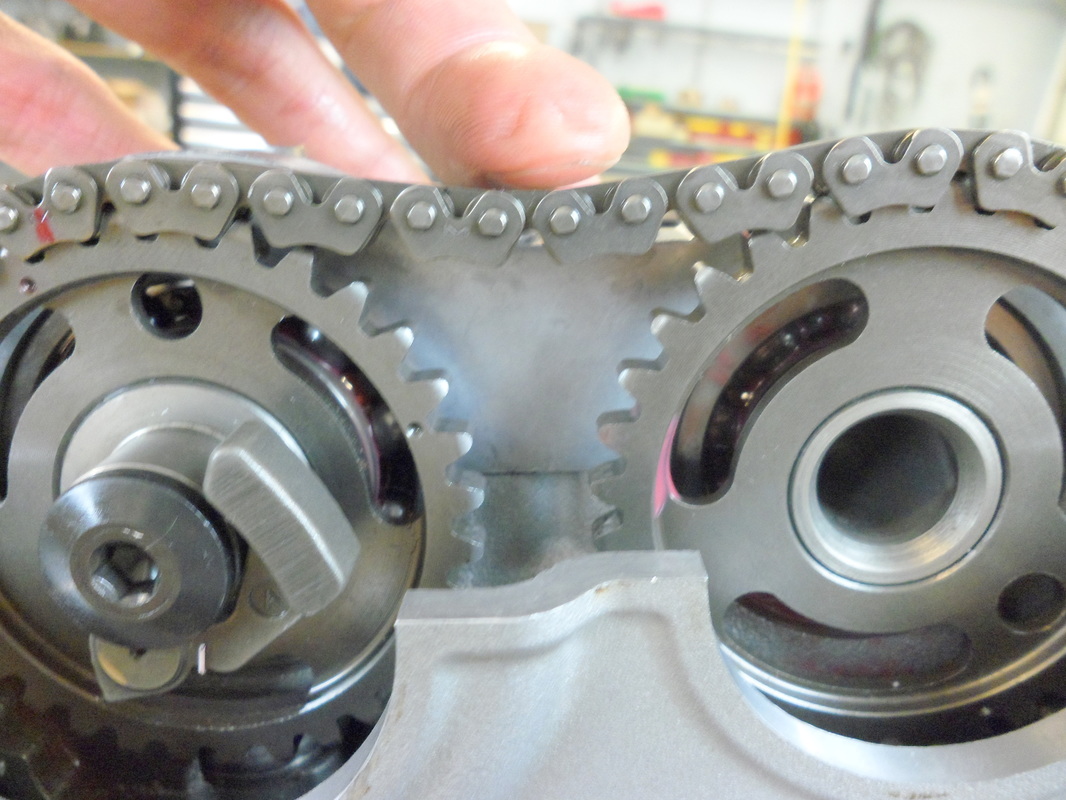
Lastly, a basic feel of the tension of the chain between the cam gears can be performed if the engine is of twin cam design.
Here, with the old chain installed there is roughly 6-8mm of slack when I pull up on the chain.
Here, with the old chain installed there is roughly 6-8mm of slack when I pull up on the chain.

Pushing down I get around the same 6-8mm of slack.
With the new chain installed I get around 3mm of slack when I pull up.
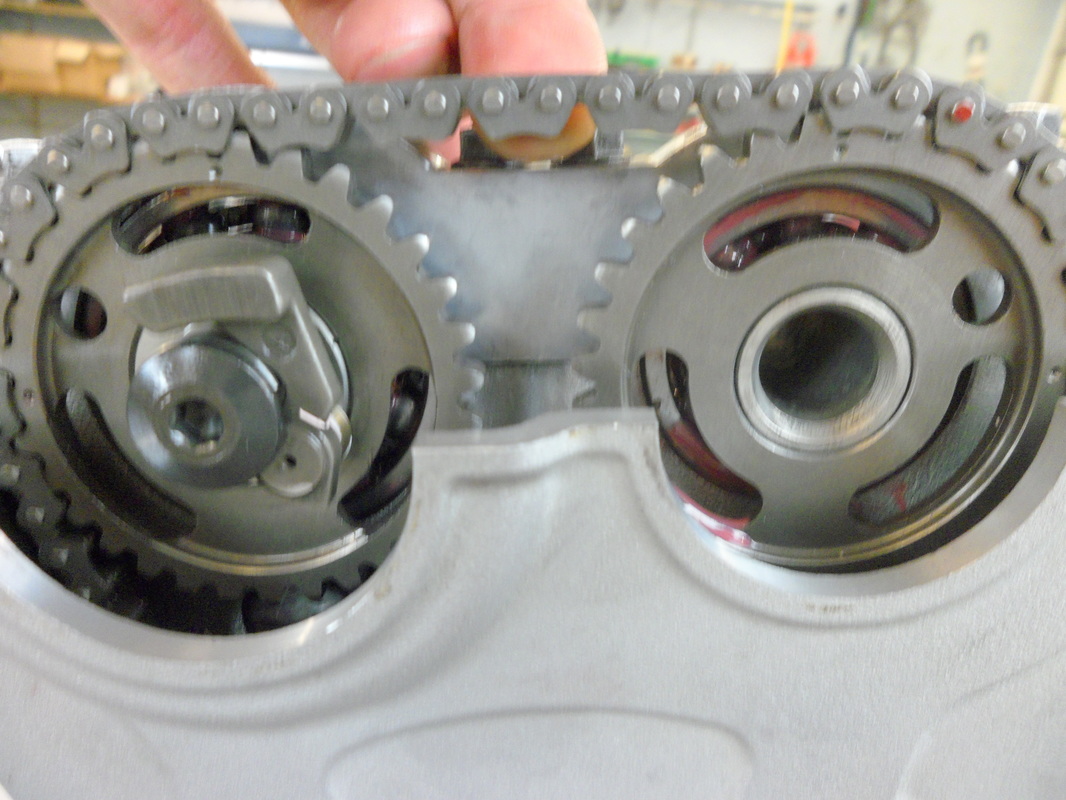
Finally, pushing down I also get around 3mm of slack.
I hope you have found my write up on ways you can determine cam chain wear useful. I know these methods require a new chain to obtain quantifiable measurements, however, even if you don’t currently have anything to compare your chain to this write up can be used to give you an idea of where your chain is at in its life. The examples I have provided are at the two extremes of the spectrum, being brand new and severely worn, and anything you encounter should fall between them. For those of you replacing your chain in the near future be sure to take the little bit of time to take a couple measurements so you have useful info to go off of down the road.
If you have additional tips and tricks relating to cam chain wear I’m all ears. Be sure to comment below!
If you have additional tips and tricks relating to cam chain wear I’m all ears. Be sure to comment below!
|
Liked this post and want more Dirt Bike Tech info?
For those of you who want to know even more about your engine and are performing your own maintenance, check out my book on engine building, The Four Stroke Dirt Bike Engine Building Handbook. This 300+ page book is full of practical engine building knowledge you can use on your next major or minor overhaul.
If you want more blog posts like this one, sign up for our eNewsletter by entering your info below. We will send you weekly tech and maintenance tips and keep you up to date on all things dirt bike! |
Sign me up for the eNewsletter!
I'm ready to take my dirt bike knowledge to the next level.