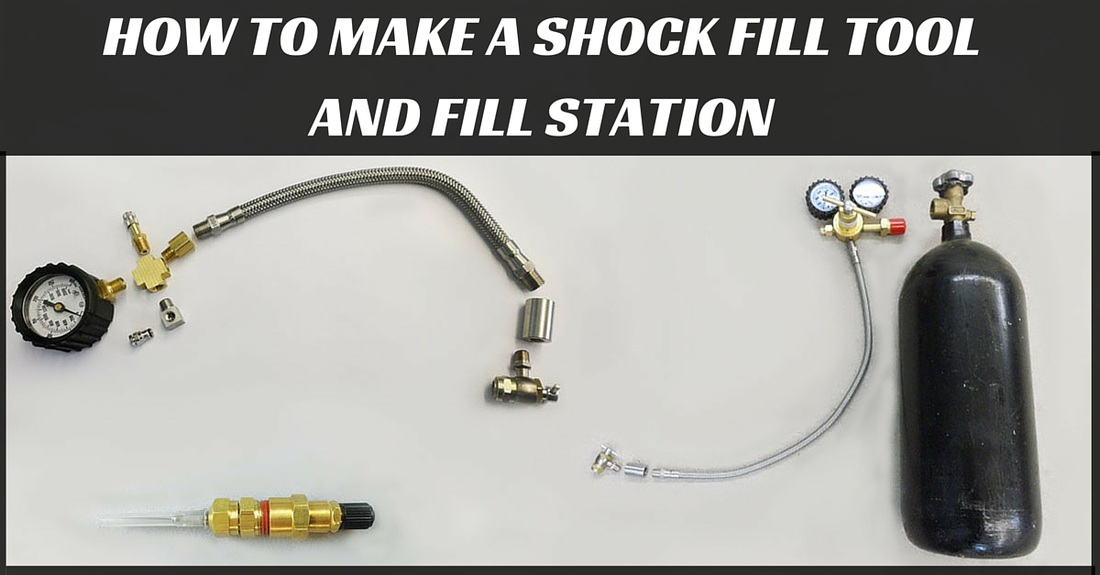
Have you ever wondered what is needed to make your own shock fill tool and nitrogen fill station? In this post I'm going to go into detail and discuss what is required to make your own shock fill tool and fill station. If you have ever been interested in rebuilding your own shocks and doing all the work in-house keep reading, this post is perfect for you!
If you aren't quite sure what the difference is between the shock fill tool and the fill station or why you need them both, no worries, I'll cover this now before we get into the details of each. There are a couple main advantages of using a shock fill tool in conjunction with the fill station. First, the pressure gauge on the fill tool has finer graduations than the gauge on the pressure regulator on the nitrogen tank. This allows finer adjustment of shock pressures. Second, the fill tool is easily maneuverable and much less cumbersome to hook up to the shock than the fill station. This is especially true when the nitrogen pressure is being fine tuned while the shock is on the bike. For these reasons I personally like to use a fill tool as it allows more accurate filling and more versatility. Now there are certainly other ways one could go about designing a pressurization system so that the fill tool is not needed but I don't plan on getting into those methods.
The primary job of the fill station is to deliver nitrogen to the fill tool at a slightly higher pressure than the specified pressure. This way the fill tool can be used to bleed pressure down to the correct value. Let's take a look at what parts comprise each tool.
THE FILL TOOL
The way I have designed my fill tool allows for parts to easily be sourced and fit together. I went with National Pipe Thread (NPT) fittings for all the connections. The fill tool features a finely graduated pressure gauge (0-300psi), a Schrader valve which accepts incoming nitrogen, a bleed valve, and a no-loss Schrader style adapter to connect to the shock.
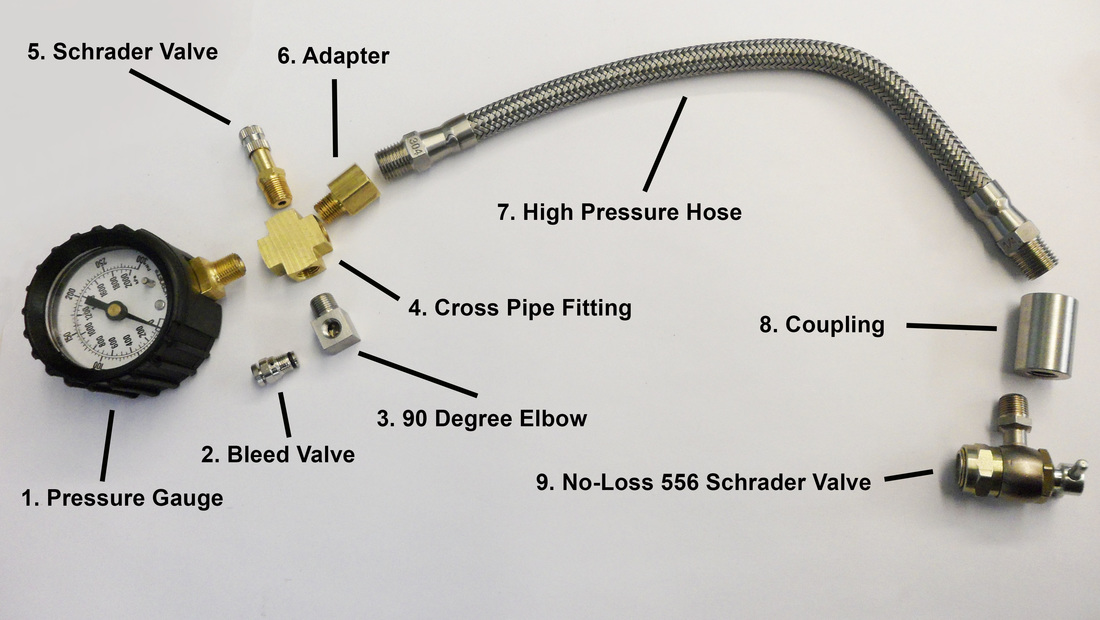
- 1. Pressure Gauge (0-300psi) - When I designed the system I thought I might work on larger shocks requiring higher pressures. For dirt bikes and ATVs I would recommend a gauge with a 0-200psi scale. Cost: $21.99.
- 2. Bleed Valve - A nice but not necessary feature which can be used to bleed pressure. If I were to do it again I would omit the bleed valve, save a couple bucks, and depress the Schrader valve to bleed pressure. Stay away from this bleed valve, if you want to go the bleed valve route, it was garbage. Cost: $6.99
- 3. 90 Degree Elbow - Used as an adapter to fit the bleed valve to the cross fitting. Omit if not using a bleed valve. Cost: $13.69 yikes!
- 4. Cross Pipe Fitting or "T" Fitting - Used to join all the parts together. Buy a "T" fitting if omitting the bleed valve. Cost (Cross): $8.79 ("T"): $3.73
- 5. Schrader Valve - Required to pressurize the shock and fill tool. Cost: $9.35
- 6. NPT Adapter - The hose I used was 1/4" NPT and an adapter was required to fit into the 1/8" NPT cross fitting. Cost: $5.30
- 7. High Pressure Hose (12") - 1800 PSI Max stainless steel hose. A bit overkill for sure, but I liked the toughness and look. There are plenty of other high pressure hose options out there. Cost: $31.11
- 8. Coupling - Required to connect the 1/4" NPT hose to the 1/8" NPT no-loss Schrader valve. Cost: $7.83
- 9. No-Loss 556 Schrader Valve - Required to maintain a gas tight seal between the shock and fill tool while filling, setting pressure, and removing the tool. Cost: $29.95
THE FILL STATION
The fill station is a simple combination of readily available parts. Check out what you'll need below.
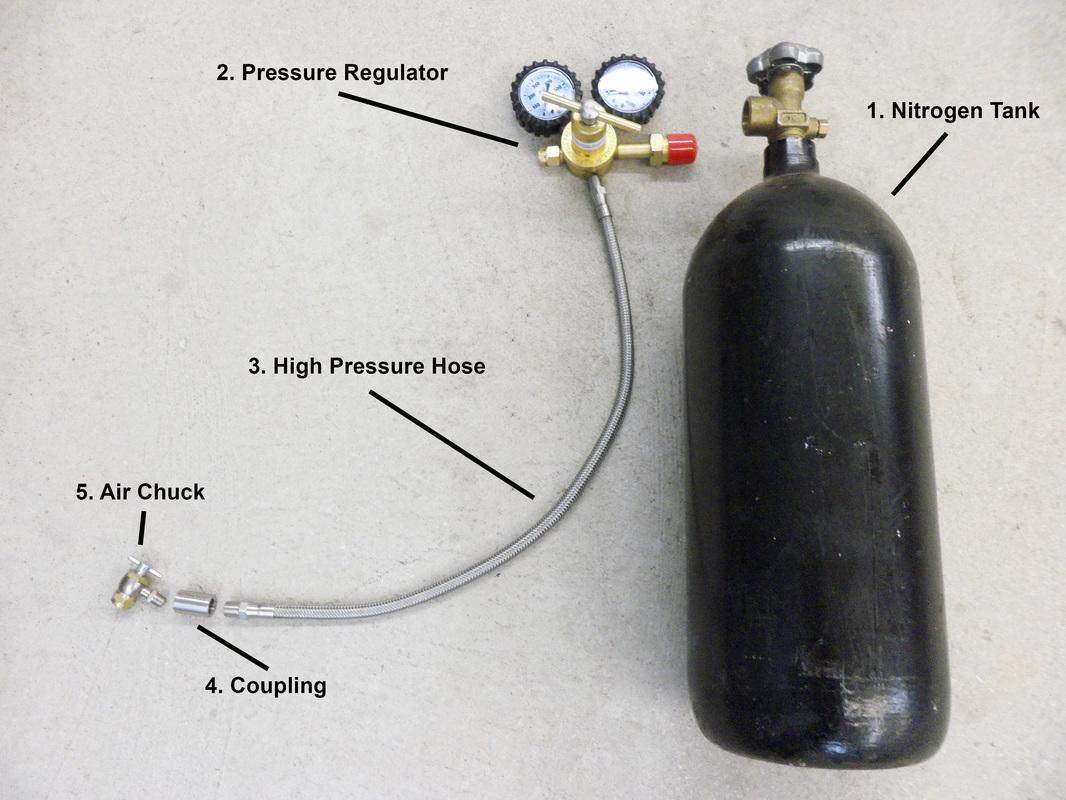
- 1. Nitrogen Tank - The biggest investment when building a fill station is hands down getting the nitrogen tank. There are two options available when it comes to getting a nitrogen tank. You can either buy the tank outright or you can rent the tank. I've always found for myself personally that it makes more sense to buy the tank. However, you'll want to do your homework and determine what makes the most sense for you. I picked up a tank from my local Praxair dealer. Cost: $167.00
I went with a 40 cubic foot tank and have not been disappointed. Its size is not too cumbersome to handle and the number of fills I am able to get out of a tank is extremely good. I've done a bunch of shock builds now and the tank pressure has hardly dropped. If you are budget conscious you may consider getting a smaller tank. - 2. Pressure Regulator (0-400psi delivery pressure) - The pressure regulator will show the tank pressure and regulate the nitrogen pressure going to the fill tool and shock. You may want to choose a regulator with a lower max delivery pressure if you don't intend on working on high pressure shocks. A 300psi delivery pressure would be more than adequate for dirt bike applications. Cost: $53.00
- 3. High Pressure Hose - I used two feet of hose to give myself plenty of length to connect the tank to the fill tool. Cost: $36.39
- 4. Coupling - A coupling may be necessary depending on the type of hose and air fitting used.
- 5. Air Chuck - Here's where you can avoid a silly mistake I made. To make the connection from fill station to fill tool a normal air chuck is all that is needed. A second no-loss adapter will work fine but it isn't necessary and is an extra expense. Plus it makes filling the shock more cumbersome. Simply source a standard air chuck for your fill station. Cost: $6.00
The total cost for the fill station comes to: $262.39 including the nitrogen tank. Without the tank the cost was $95.39 which I found to be competitive with offerings on Ebay and other sources.
SOURCING PARTS
For my fill tool and fill station I got my parts from three sources, McMaster-Carr, Ebay, and Amazon. You may be able to find parts cheaper locally or through other online sources but these were my go to's. You can click all the links above to go directly to the individual parts if you want to copy my setup.
TOTAL COST
So the big question is, is investing in a nitrogen filling setup worth it? That will depend a lot on your personal circumstances. If you have a lot of bikes to maintain, like doing all aspects of maintenance yourself, or don't live near a suspension shop then it might be a good investment and it won't take long to recoup your money. However, if you only service a shock or two per year, the costs may not be justifiable.
For me I love setting my bikes up, maintaining them, and understanding the ins and outs of all the systems at play so it was a no brainer for me to take the plunge and get equipped to pressurize shocks. I also don't have a suspension shop within an hour and a half of where I live so it has been cumbersome in the past to have my shocks pressurized.
The total investment into my setup is $397.39. Most suspension shops charge around $100.00 for labor to service a shock. So if you were to do this job yourself from here on out, it would only take four shock rebuilds to recoup your costs. I have three bikes and their shocks get serviced multiple times per year so it has proven to be a worthwhile investment for me.
Take into account that the turnaround time is much faster, so you won't be left without a bike to ride. Plus you won't have to spend any time hauling your shocks to and from the shop and it might just make sense to invest in a nitrogen filling setup.
CONCLUDING REMARKS
I hope this post has spurred you to consider what it takes to pressurize shocks and that you spend some time determining if it makes sense to do it yourself. I know my setup isn't perfect and that some of the parts can be sourced at lower costs, however, it does provide a good example for you to work from. I have no doubt you'll be able build your own setup based off my notes and recommendations!
Once you get your nitrogen station sourced I want to invite you to check out some great instructional tools that you can use to learn how to correctly rebuild your shocks. We recently released the Showa and KYB Shock Building Video Manual and eBook so that you can learn how to rebuild your own shocks. For your reference, Showa and KYB shocks are used in all Japanese motorcycles, so if you ride any of the Japanese brands these shock building instructionals will be a huge help to you.
To learn more about the Shock Building Video Manual and eBook check them out here:
Showa and KYB Shock Building Instructionals
If you have questions, comments, or want to share a tip to improve my setup please feel free to do so.
Paul
 |  |