
“Splitting the cases” is often referred to as a daunting or undesirable task, but if you are well prepared and properly equipped then it can be a straightforward job. To alleviate any concerns you may have with the task, I want to discuss best practices and share some tips that you may find useful when dealing with crank bearings that utilize an interference fit with the crankshaft. We’ll get started by discussing preparatory items and work through to completing the job.
Preparation
I always recommend prepping for crankcase separation by thoroughly reviewing the service manual. This is important in case any special instructions are present, such as guidance on how the crankcases should be positioned. Typically, it is advantageous to lift one half off the other in a certain orientation due to the way the gearbox or other components are installed. Secondly, a review of the manual may highlight any specific hardware that must be removed prior to attempting to split the cases.
From a tools standpoint, a crankcase splitter tool is a worthy investment because it will help ensure the job goes smoothly. Case splitters are relatively inexpensive and widely available. Alternatively, for the budget conscious or lesser prepared, a case splitter is something that could be fabricated. Whether buying or making, ensure you pick up a model with a protective end cap for the crankshaft or fabricate one. We’ll discuss the end cap later. The other tools required are all fairly standard and include your typical sockets, wrenches, and soft mallets.
From a tools standpoint, a crankcase splitter tool is a worthy investment because it will help ensure the job goes smoothly. Case splitters are relatively inexpensive and widely available. Alternatively, for the budget conscious or lesser prepared, a case splitter is something that could be fabricated. Whether buying or making, ensure you pick up a model with a protective end cap for the crankshaft or fabricate one. We’ll discuss the end cap later. The other tools required are all fairly standard and include your typical sockets, wrenches, and soft mallets.

Wooden blocks or other soft semi-malleable spacers should be selected which level and raise the crankcases off the tabletop. This allows the cases to be positioned so that the split line between the cases lies horizontally and subsequent splitting can be done vertically. This will help ensure evenness of separation as well as reduce the likelihood of components falling out of the cases unexpectedly.
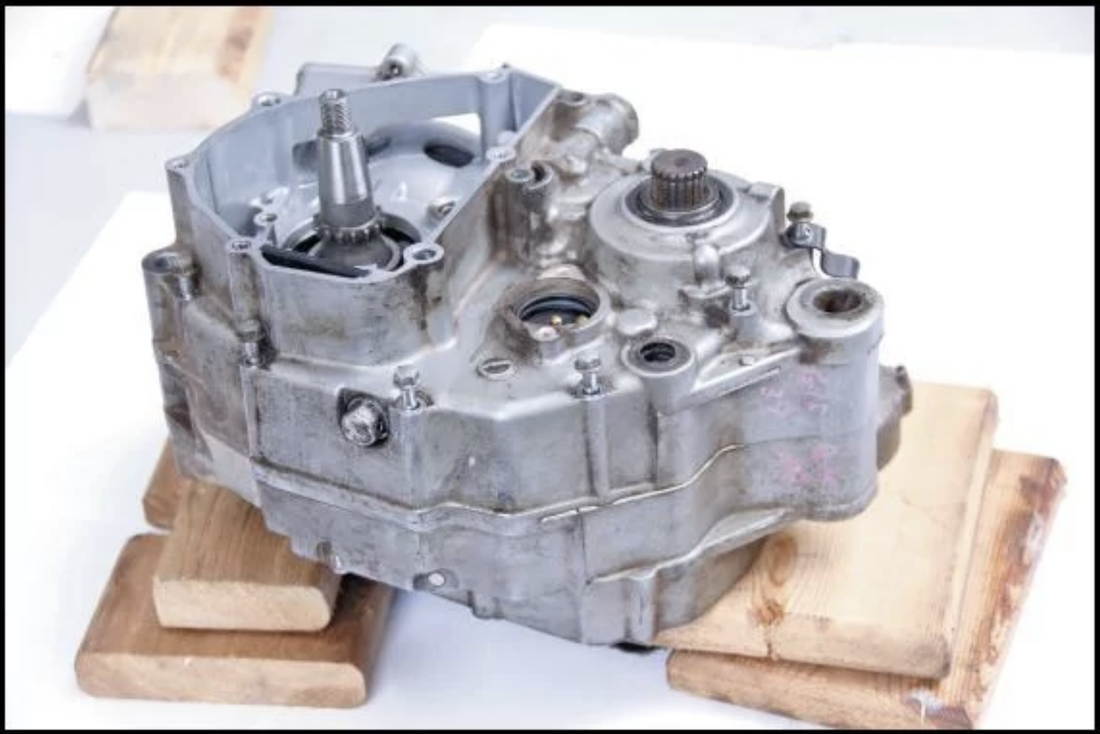
As much as shortcuts are desirable, just about everything external to the cases must be removed in order to successfully split the cases. Clutch, stator, crank gear, etc. must be removed prior to case splitting. Your service manual will provide further clarity as to what needs to come off.
Tips + Techniques
Once you’re ready to separate the cases, the first thing we’ll need to do is remove all the crankcase bolts. The crankcase bolts should be removed via any prescribed patterns outlined in the service manual. Since the crankcase bolts are typically several different lengths, ensuring the location of each bolt is well documented is extremely important. As I discussed in my post on keeping track of bolts, the cardboard gasket method or any other you find suitable should be utilized so that the reassembly process is straightforward later on.
After the crankcase bolts have been removed, the crankcases should be inspected one final time to ensure no hardware that should have been removed prior is hitchhiking. Trust me, trying to separate cases only to find there is one last forgotten bolt is quite frustrating! Once you’re confident all the necessary hardware has been removed, position the cases on the blocks with the correct half facing up.
Next, install the protective cap over the crankshaft. I advise using the cap whether you own a two or four-stroke simply because in both cases it helps preserve the end of the crankshaft. This is of particular importance on four-stroke engines that utilize an oil feed that passes through the crank.
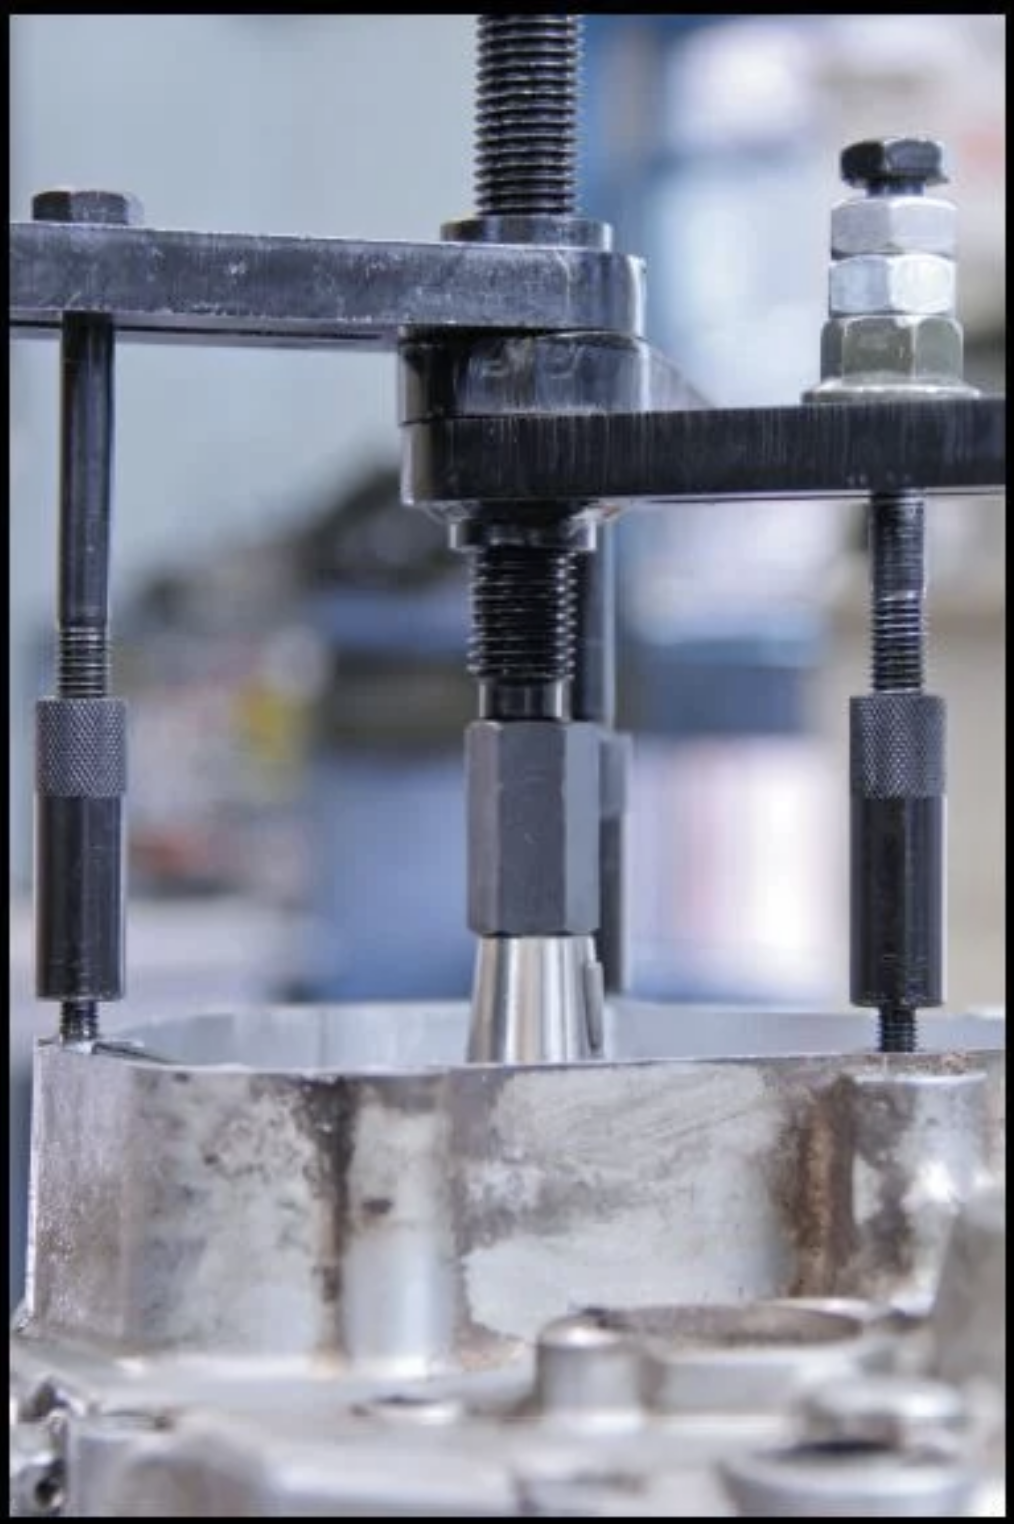
Once the crank end is protected, proceed to install the crankcase splitter. Select threaded holes that are as close to equi-spaced from one another as possible to promote uniform loading of the case splitter. When threading the case splitter studs into the crankcase, make sure you engage at least 1.5 times the diameter of the stud diameter. For example, if the stud is 6mm in diameter make sure at least 9mm of thread engagement length is achieved. This will help ensure the threads are not stripped when you attempt to separate the crankcases.
With the crankcase splitter installed begin tensioning the main bolt against the end of the protective cap. Proceed to tighten the bolt until the crankcases begin to separate about a 1/16” (1.5mm). Once separation has occurred, make sure that separation is even all the way around the cases. Due to the way the case splitter loads the cases, the area near the output sprocket tends to lag. Case separation needs to be even so that the dowel pins used to pair the cases together don’t bind.
With the crankcase splitter installed begin tensioning the main bolt against the end of the protective cap. Proceed to tighten the bolt until the crankcases begin to separate about a 1/16” (1.5mm). Once separation has occurred, make sure that separation is even all the way around the cases. Due to the way the case splitter loads the cases, the area near the output sprocket tends to lag. Case separation needs to be even so that the dowel pins used to pair the cases together don’t bind.
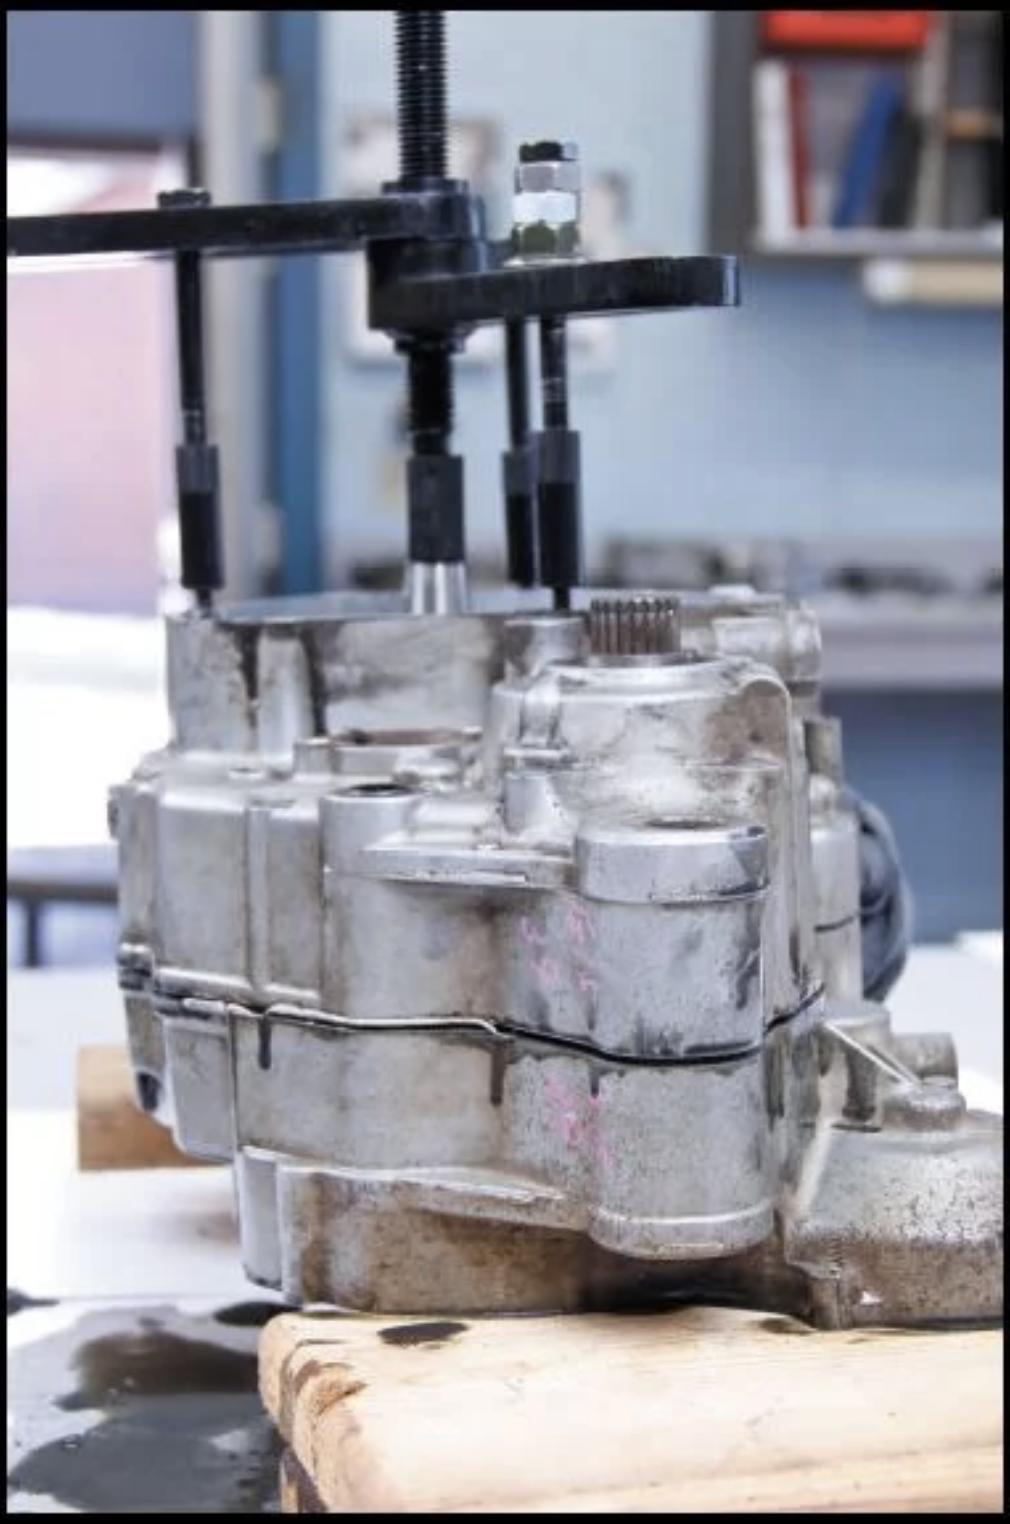
If the output sprocket end of the cases hasn’t separated, use a soft rubber or plastic mallet to gently tap in that area. Tap carefully and only on case areas that appear sturdy. Once you’ve created an even gap, proceed to tension the splitter bolt, tap when necessary, and fully remove the crankcase.
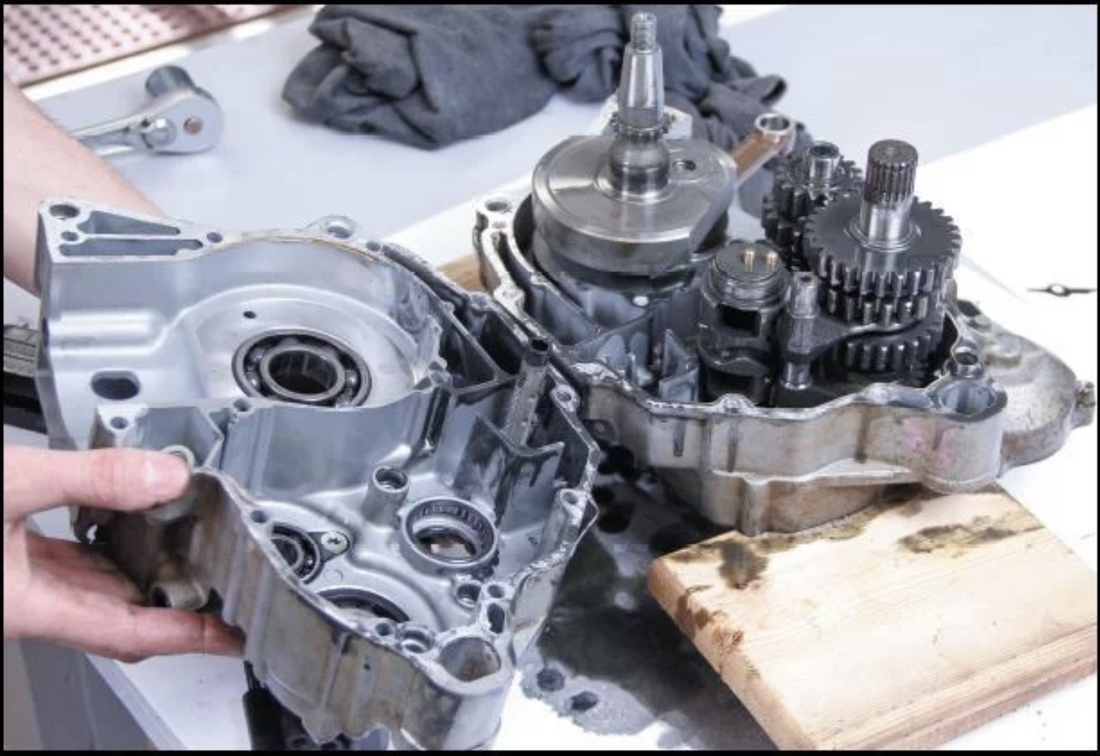
Upon separation, make sure that no gearbox components, such as washers, have stuck to the case.
What I’ve described is the ideal sequence of events for a successful case separation, however, occasionally the cases won’t be as cooperative. In the past, I’ve had to deal with crankcases where moisture has found its way into the dowel pin bores and corroded the dowel pins. This effectively seizes the dowel pins in their bores and makes the separation job more challenging.
If the crankcases are being resilient to separation, stuck dowel pins may be a potential problem. Most dowel pins are located opposite one another and their exact position can often be referenced in the service manual or in the crankcase section of part microfiches. Once the location of the dowel pins has been confirmed, a torch can be used to lightly heat the dowel pin areas. Heat will expand the metal surrounding the dowel pin and aid in freeing up the stuck pin bore. Usually, a few careful rounds of heat, tension on the splitter, and well-placed tapping is enough to free up the pesky cases and get them separated.
Alternatively, if the heat does not help, applying a penetrant to the pin bore areas is another option that may help free things up. If you find yourself dealing with stuck cases, the key is to be patient and think through all your options. In these types of situations, most mistakes are avoidable and are usually the result of rushed decisions.
Once the cases have been separated, the remaining tasks of removing the gearbox and pushing the crank out of the remaining case half can commence. I hope you’ve enjoyed this write up on crankcase separation and that it makes you more prepared for the job. If you’ve got additional crankcase separation tips that you want to share, please leave a comment below.
For additional engine building information, whether two or four-stroke, check out my engine building handbooks. Each handbook is offered in print or digital form, contains over 250 color pictures, detailed instruction from start to finish on full rebuilds, and contains a wealth of information pertaining to diagnostic testing and precision measuring.
Sign me up for the eNewsletter!
The DIY Moto Fix Weekly eNewsletter is full of in-depth technical and maintenance tips to help you care for your dirt bike.