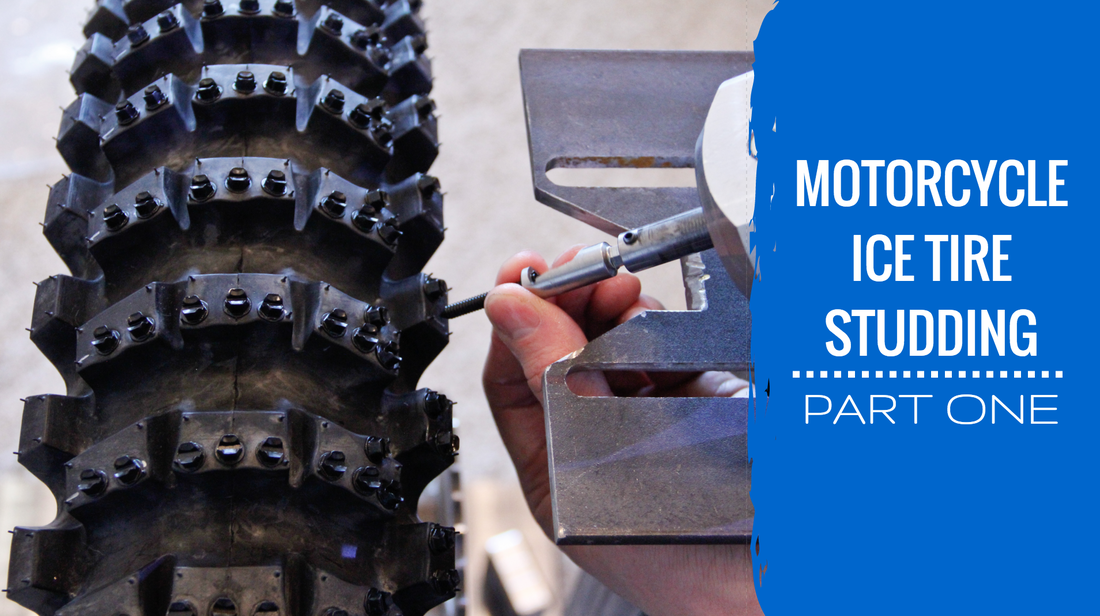
In today’s post I’m going to get into the details related to tire studding with the help of an industry expert. To help bring you the best information I can on studding ice tires, I’ve enlisted Jarrett King of Two Wheel Endeavors to help with this article. For those of you that don’t know, Two Wheel Endeavours is heavily involved in supporting Canadian ice racing efforts and offers studded tires, ice racing accessories, and custom ice solutions. Jarrett was involved in the development of the Mitas Ice King tires, knows his craft, and brings a lot of knowledge to the table.
I hope 2016 is treating you well so far! This last weekend I participated in the Steel Shoe Fund 3 Hour Endurance Ice Race out on Kettle Moraine Lake. For those of you not living in the northern midwest, last weekend averaged about 0 degrees Fahrenheit and the wind chill made it feel like 10 below. Regardless, there were over 65 teams that raced and the day was a blast. Unfortunately we had a serious injury out on the track and they had to call it before anyone officially completed the race. Last I heard the rider is doing fine now, thank goodness! Hopefully I get a few more ice races in before the winter season is over.
Today I want to talk about six characteristics that are necessary to have when one sets out to build an engine. I’ve detailed how to tackle many different jobs, but honestly that is only half the battle. If you’re in a rush or lack the desire to understand the reasons behind what you’re doing, you will make mistakes and miss out on important things. Listed below are the traits that I believe can help you take your build to the next level. 1. Being Detail Oriented What’s worse than getting started on a build only to realize you didn’t buy an important replacement part? Focussing on the details of a project can feel tedious at times but can pay off in the grand scheme of things. Before I get started on a project I spend a hefty amount of time researching what parts I’m going to replace and where the best prices are. Also, I will have a solid idea of the sequences I’ll use for disassembly and assembly. Another good habit for the detail oriented is to take notes throughout the build, which you can use at a later date should the need arise. When you have an appreciation for all the small details that go into a build, it will make for a much smoother project. 2. Having Patience Have you ever been in a rush to do something and after you’re done you realize if you had spent just a bit more time the project could have turned out much better? I was this way with so many of the things I did when I was younger, but have learned to slow down and be patient as I work. Engines don’t go together instantaneously and being patient throughout the process, especially when things aren’t going as planned, is very important. There is nothing worse than making a huge mistake because you’re in a rush. Imagine finishing a build and realizing you left an important part on the table, depending on where the part came from, you just bought yourself another few hours of work. Trying to skimp on time more often than not costs you more time in the long run. Have patience and enjoy the process. 3. Being Observant Just about every mechanical thing is gleaming with a story, and that story only reveals itself if you know what to look for. An engine is no different. From the parting lines on a component left by the casting tooling used to create it to wear patterns on a piston, there are hundreds of observations that can be made while working on an engine. As you work, keep an eye out for subtle anomalies that may tell you why something failed or broke. For example, things like snail tracks across a gasket, raised edges on gasket surfaces, or covers that don’t sit flat on a table - these are all good indicators of why a particular part was leaking. 4. Being Curious Perhaps more appropriately titled, “a desire to understand mechanical workings”. It is incredible how much can be learned about the engine just by studying how specific parts interact within it. An engine is composed of many different subsystems and they must all work in order for the engine to function. By looking at the various interactions of the parts within an engine, the condition of the parts and reasons for any failures can be more easily understood. The next time you build an engine, challenge yourself to learn how all the different subsystems of the engine work. Once you learn this, diagnosing problems and identifying all the faulty parts becomes much easier. 5. Being Meticulous The necessity to be thorough and meticulous throughout a build cannot be overstated. Whether it be taking extra steps to inspect components, measuring new parts, or taking extra time to ensure the condition of surrounding subsystems are okay, having meticulous tendencies can pay off. As an example, on more than one occasion I’ve purchased new parts that have been mispackaged or out of spec. Had I not made the choice to carefully measure the problematic new parts, I could have ended up with an engine that was destined to fail. While it may take more time to be meticulous throughout a build, there is a lot at stake, both in terms of time and money, making it all the more important to ensure everything is done correctly. 6. Having Ambition Building an engine can be hard, things can go south unexpectedly, and projects can easily stall. Being ambitious and having a can-do attitude is important to ensure the engine doesn’t sit half torn apart in the garage never to be completed. Until you tear into the engine, you never know what you might find. I’ve disassembled engines many times in the past only to find I need to replace a lot more parts than I had planned (this seems to be my luck when I shop for bikes on Craigslist as of late). This can be a huge downer, but keeping the end goal of getting back out and riding in mind and having the desire to push through any and all obstacles is a must. Do you have any engine building characteristics you want to share? Leave a comment below and tell everyone what you think it takes to build a great engine! For those of you that believe you possess the characteristics of a good engine builder, be sure to check out my book, The Four Stroke Dirt Bike Engine Building Handbook, to learn more about the how and why behind engine building. Whether you want to be taught about the relationships between all the various parts within an engine, you are in need of pointers on picking the right performance parts, or you would like to see examples of wear patterns found on engine components, my book is here to guide and help you throughout your build. With 2015 now in our rear view and 2016 in its infancy, I wanted to reflect on the past year as well as share my goals for DIY Moto Fix in the new year. First and foremost, I have to thank you. 2015 would not have been the year it was if it wasn’t for all of you curious and courageous bike owners out there. Thank you for your willingness to learn more about your bikes and for choosing to trust your time with DIY Moto Fix.
This week I want to share with you a great resource in the world of DIY motorcycle repair by introducing you to my friend Matt Bochnak’s website: How To Motorcycle Repair. Matt introduced himself to me when I was just starting DIY Moto Fix last fall. Unbeknownst to me at the time, Matt had already created a site aimed at helping DIY motorcycle enthusiasts in 2012. With a few years of experience under his belt, Matt knew a lot about the DIY crowd and was extremely generous in giving me pointers as I put my site together. We’ve been in touch ever since and have been continuously bouncing ideas and tips back and forth to each other.
So with all the new reasons to get out and shop post-Thanksgiving (now you've got Black Friday, Small Business Saturday, and Cyber Monday) here at DIY Moto Fix, we figured we would make it simple and just have one big four day sale.
Whether you're the one getting up at 5am to get the best Black Friday deals, or you're the one driving 90 minutes north to go ride in the dirt all day (that would be us), from today through Monday the 30th, everything on the DIY Moto Fix site will be available at 30% off. We normally don't go this steep with our discounts, so you definitely want to jump on board for this one before Monday the 30th is over. If you are taking off for a weekend of riding, then be sure to share this post with your significant other so they know what to put in your stocking this year! Start making your wishlist by clicking here!
Generally speaking, when two fuels are blended the octane rating of the resulting fuel is approximately the average of the two fuels. So if you had a gallon of 87 octane and a gallon of 93 the resulting blend would have an octane rating of 90. I'll be the first to admit that 1/3 of a gallon of fuel added to a two gallon gas can won't have much effect on the octane rating. For those of you that like numbers, 0.33 of a gallon of 87 added to 1.67 gallons of 93 will yield the following octane rating:
0.33 gallon of 87 / 2 gallons = 16.5% of the total mixture 1.67 gallons of 93 /2 gallons = 83.5% of the total mixture (0.165 x 87) + (0.835 x 93) = 92 octane blended fuel So in a two gallon can, the octane rating of the fuel has dropped a point due to the 1/3 gallon of 87 in the pump hose. Unless you have a very well developed performance engine, this isn't anything to lose sleep over. I think a bigger reasons to want to keep that 1/3 of a gallon out of your can is due to the possibility of ethanol being in the hose from the previous sale. Many articles can be found outlining why ethanol should be avoided, but the main reasons include part corrosion due to the exposure to alcohol, rubber seals and o-rings may not be compatible with ethanol resulting in swelling and failure, and some plastics deteriorate when exposed to ethanol. Not to mention ethanol contains less energy than gasoline. Again, we're not talking about a large percentage of ethanol in the overall scheme of things but I prefer to stay away from the stuff when I can. Fueling Tip I'm very careful about what I run through my powersport engines. To safeguard against filling up a fuel can with residual fuel from the previous sale, I like to donate the first gallon of "premium" to my vehicle before filling my gas cans. This ensures whatever fuel was in the hose and pump is flushed out and that I'm filling up my cans with premium. If you are borderline OCD about what goes in your engines like I am, you may consider adopting this practice. I suspect many of you have other tips and tricks regarding fueling. Leave a comment below and share your thoughts and experiences so other motorheads can benefit! Print Book Giveaway I hope you are all doing well and getting out and enjoying the fall weather. I know it has been awhile since my last post and I'll get to that in a sec. For those short on time I want to quickly introduce a giveaway we've set up that you can participate in. In honor of Halloween I've set up a contest on Facebook where I'll give away a signed print book to some lucky person. To enter the giveaway all you need to do is: 1. Share the post with a fellow motor head. 2. Leave a comment below and tell us what bike you have or want That's all there is to it. I'll select a winner on November 1st. You can follow this link to get to the contest: Facebook Contest For those of you not on Facebook, I'll also accept entries if you send me an email. Just introduce yourself, tell me what bike you're riding, and if you've got any cool projects coming up. You can reach me at: [email protected] The Past Month The last month and a half has been full of obligations and change for me. At the center of all that was my decision to take a new job as a powertrain engineer for Deltahawk. Deltahawk is a startup company that is working on producing a V4 two-stroke diesel aircraft engine. I'm a huge aviation fan and ran into them this year at Oshkosh. I was presented an opportunity I couldn't resist so I jumped on board and am now spending my weekdays working with them. With the new job came the joys of relocation, so I've packed up and moved to Racine, WI. If anyone lives in the Southeastern WI area and has recommendations or can offer up a place to ride - I'd love to hear about it. So far I've found Bong Rec Area, Rocky Glen OHV, Aztalan, and a couple others. The problem is most are quite a trek. I got spoiled in Northwestern, WI where trails and private land were close by! With the start of a new job on the horizon, I decided I needed to take one last trip before someone else started monitoring my vacation time. I went out to the Blackhills in South Dakota in early September and had an amazing time riding dirt and street bikes for four days. The weather was great, there were no mechanical problems, and I managed to come back in one piece! The rocky riding and elevation changes involved were awesome to experience and I would highly recommend anyone looking for a destination to ride bikes to consider the Black Hills. The street riding was equally impressive with plenty of turns and mostly empty roads. Just watch out for the buffalo chips, you don't want to have to explain to someone you low sided because you hit a piece of poo (NOT speaking from experience here). Along with the new job, trip, and relocation, the Four Stroke Dirt Bike Engine Building Handbook was finally released as a print book on September 10th. All I can say is that bringing the book to market in print form was very challenging and that I'm thankful for the warm response. When you sink so much time and money into a project, there are always some reservations as to what the end result will be. Will the book sell? Will I be stuck forever with a bunch of paper weights? Fortunately the response has been great and I've received a lot of emails thanking me for putting the book together. ThumperTalk has even reviewed it and given it their blessing. You can read their review by clicking here.
For those of you who have bought a book, thank you very much. I appreciate your support and hope that you are enjoying it. If you're on the fence about getting the book, check out the TT review and take a closer look at what the book has to offer. I truly believe it will be a helpful tool when it comes time to perform your next rebuild. What's Next? Even though I've been short on time, I've been thinking a lot about the future and I'm very excited to see what happens next. I just ordered new ice tires for this season and will be setting up a different bike this year (YZ250). There will be a lot of work going into getting the bike set up correctly. My hope is to take you from start to finish on what I do when I set up a bike for ice riding and how I work through the development process. I'll be the first to say this is an area of my skill-set which I'm still refining, but I'm getting more comfortable making mistakes publicly and think it would be a good learning exercise for everyone involved. Even though I'll be focusing on an ice bike, by the end of the series of write-ups you should come away with some good pointers on how to set up a bike for any application. As always I appreciate comments and would enjoy hearing your thoughts on what's in the pipeline. Also, be sure to enter the contest for the signed print book by heading to Facebook or sending me an email.
A couple weeks ago I talked about making a nitrogen filling station. Today, I want to present information on the tools you'll need to service a shock. Plus I want to cover commonly replaced parts.
I suspect many of you currently take your shock to someone to have it serviced when it needs to be freshened up? I also bet that it is usually a pain to be without a bike for perhaps a week and that it probably costs around $100 each time? I know I always dreaded having suspension work done on my bike because it seemed to take forever, plus I always had to drive over an hour and half to the nearest shop. For me, those days are long gone. Now I do all my suspension work myself. I believe the majority of you are completely capable of servicing your shocks yourself, but just don't quite have all the pieces of the puzzle you need. Maybe you're not quite sure what tools you need; or once you get the shock apart, you don't know what parts you will have to replace? To help clarify what's needed to service a shock and answer some of the common questions about shock building, I created a detailed guide for you. The guide will help you decide if outsourcing your shock maintenance is the way to go or if you are in fact ready to take the job on yourself. Before I discuss the details of the guide, I want to provide you with a little background on shock absorbers. For major motorcycle brands, shocks are sourced from the following companies: Showa, KYB, and WP. These three brands are primarily the companies responsible for equipping OEM bikes. Companies, such as Ohlins, cater more towards the aftermarket. Out of the three common OEM shock brand options, Showa and KYB are the go-to's for the Japanese manufacturers, while European brands, such as KTM, gravitate toward the WP brand. So if there is any question as to what brand of shock you have, you can keep this in mind. Out of the three common OEM brands, Showa and KYB shocks are very similar, while WPs feature a slightly different design. The guide I created is geared towards those of you with either Showa or KYB shocks. Those of you with WP shocks may still find the guide useful, but there are a couple tools missing. Within the eight page guide, you'll be provided information on all the tools you need to service a Showa or KYB shock. These tools include any specialty tools and discuss shock pressurization options. Plus there are some pointers on how to make your own specialty tools if you are on a budget. Once you get through the tools section you'll be presented with a detailed outline on replacement parts. Knowing what to replace within the shock when it is due for servicing is extremely important and the replacement parts section will walk you right through what you may need. It will also provide you with different options for buying replacement parts. To learn more about shock building and download the free guide, simply enter your email below.
If you have any questions or have something to contribute please leave a comment. I enjoy hearing from you all!
Paul
In my last post I covered what a leak down test is and how it can be used to determine engine problems. Today I’ll go through and detail how to do a leak down test on your dirt bike engine step-by-step.
|
InspirationsCategories
All
Archives
November 2022
Favorite Films |